Accessing the UCalgary Baja Archive Network Share on Windows 10 or 11
The Archive is a shared network folder that you can open from Windows File Explorer. You can open it when needed, or map it as a network drive so that it appears alongside the drives on your computer.
Network share details
Folder:
\\100.64.0.3\archive
Username:baja_smb_member
Password: **Ask a network administrator**
Before you begin
- These instructions apply to Windows 10 and Windows 11.
- Make sure Tailscale is installed and connected to the UCalgary Baja network. If you have not completed team software setup, use Baja Connect first.
- Ask a network administrator for the Archive password. Do not post the password in team chats or documentation.
- You do NOT need to enable Windows network discovery or change Windows sharing settings just to connect directly to this folder by its IP address.
1. Open the shared folder
These steps are the same in Windows 10 and Windows 11. Use this method if you want to access the Archive without assigning it a drive letter.
- Press Windows + E to open File Explorer (the folder icon on the taskbar or Start menu).
- Click the address bar at the top of File Explorer. You can also press Ctrl + L to select the address bar.
- Type or paste the following path exactly as shown, including both starting backslashes:
text \\100.64.0.3\archive - Press Enter.
- If a Windows Security or Enter network credentials window opens, select More choices → Use a different account if necessary. Enter:
- Username:
baja_smb_member - Password: **the password obtained from a network administrator**
- !! Ensure Remember my credentials is checked
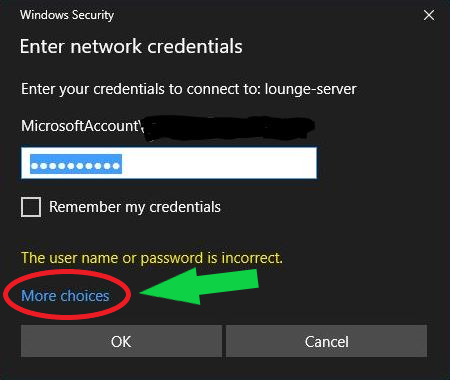
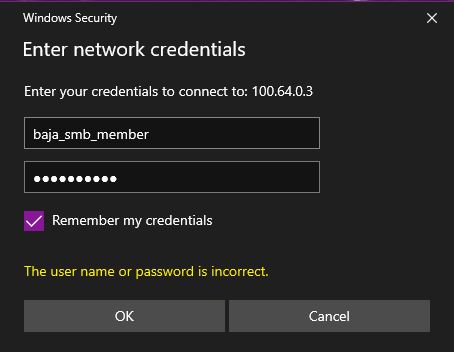
It will say "The user name or password is incorrect" when you first access the folder. That is because it is trying to access the folder using your windows credentials, which are obviously incorrect.
- Username:
- Click OK. The Archive folder should open in File Explorer.
If you use this method, the folder does not become a permanently mapped drive; you can repeat the steps whenever you need access.
2. Map the network folder as a drive
Mapping assigns the Archive a drive letter (for example, Z:). That makes it appear under This PC like your local drives, so you don't have to enter the network address every time.
Windows 10 steps
- Press Windows + E to open File Explorer.
- In the left navigation pane, click This PC.
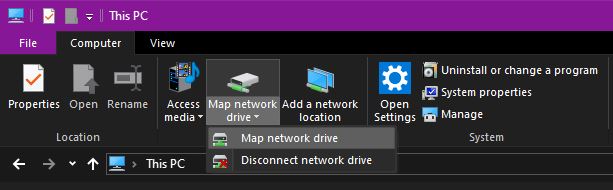
- At the top, select the Computer tab.
- Click Map network drive (the drive icon in the ribbon).
- Continue to Complete the drive mapping below.
Windows 11 steps
- Press Windows + E to open File Explorer.
- In the left navigation pane, click This PC.
- At the top, click See more (the three-dot
...icon). - Select Map network drive.
- Continue to Complete the drive mapping below.
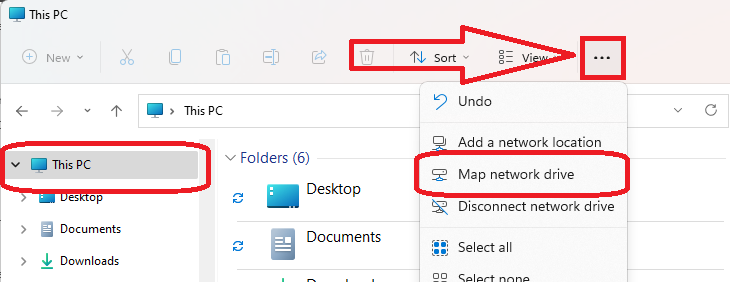
Can't find “Map network drive” in Windows 11? Make sure you selected This PC, not another folder. You can also right-click "This PC" in the left sidebar and select Map network drive.
Complete the drive mapping (Windows 10 and 11)
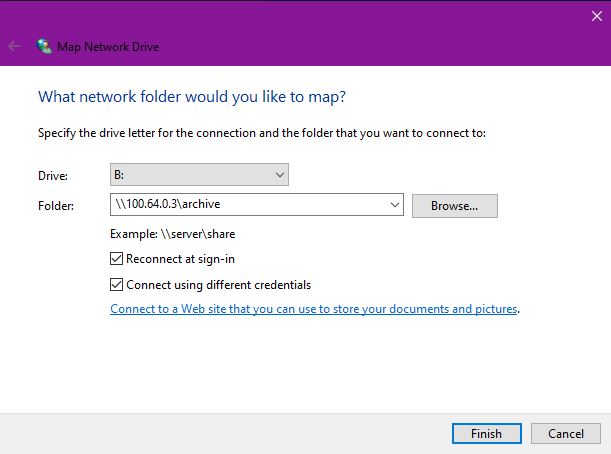
Once the Map Network Drive window appears:
- Under Drive, choose any unused letter.
B:is a useful example, but you can choose another available letter. - Under Folder, enter:
text \\100.64.0.3\archive - Select Reconnect at sign-in if you want Windows to keep the drive mapping for future sign-ins.
- Check “Connect using different credentials.” This lets you enter the Baja Archive account rather than relying on your personal Windows sign-in.
-
Click Finish.
-
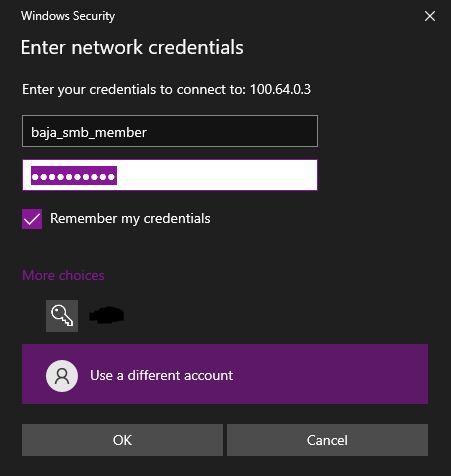
When Windows Security asks for credentials, enter:
- Username:
baja_smb_member - Password: **the password from a network administrator**
- Username:
- If Windows shows a different saved account, select More choices → Use a different account to enter the Baja username.
- Optionally select Remember my credentials only on a trusted personal computer, not on a public or shared computer.
- Click OK.
The drive should now appear in File Explorer → This PC, under Network locations, using your chosen drive letter. Opening it will take you to the same Archive folder.
Note: If Reconnect at sign-in is enabled, the mapped drive may initially display as disconnected after Windows starts. Connect Tailscale first, then double-click the mapped drive to reconnect.
3. Access the mapped drive later
- Make sure Tailscale is connected.
- Open File Explorer with Windows + E.
- Click This PC and find the Archive drive under Network locations.
- Double-click the mapped drive to open it.
Remove the mapped drive
If you no longer need the drive letter, open This PC, right-click the mapped network drive, and select Disconnect. This only removes the drive mapping from your computer; it does not delete the shared Archive folder or its files.
Troubleshooting
| Problem | What to try |
|---|---|
Windows cannot access \\100.64.0.3\archive |
Confirm Tailscale is running and connected to the UCalgary Baja network, then retry the exact path. |
| Username or password rejected | Use baja_smb_member, check the password with a network administrator, and choose Use a different account if Windows picked a saved login. |
| Map network drive option is missing | Open This PC first; in Windows 11, try right-clicking This PC in the navigation pane. |
| Mapped drive has a red X or appears disconnected | Connect Tailscale and then double-click the drive to reconnect. |
| Drive letter is already in use | Choose a different available letter in the mapping window. |
| Windows reports conflicting connections or credentials | Disconnect any existing connections to the same server, or ask a network administrator to help clear old saved network credentials. |
Still having trouble? Contact a UCalgary Baja network administrator and include your Windows version, the error message, and whether Tailscale shows that it is connected. Do not send your password.
The images above are instructional illustrations of the Windows controls, not screenshots from a particular computer. Appearance can differ slightly by Windows version or update. For the official Microsoft walkthrough, see File sharing over a network in Windows. Be aware though, it's not a good guide.