Git: Beginner's Guide (Windows 10 & 11)
UCalgary Baja — setting up your first local copy of an existing GitHub repository
This guide assumes you are a team member using Windows 10 or Windows 11 and working with a repository in the UCBaja GitHub organization. It uses Windows Command Prompt (cmd.exe), either opened directly or as the Command Prompt profile in Windows Terminal, plus Git for Windows and an SSH connection to GitHub. Commands run on your computer, not on the GitHub website.
The most important team rule: Create one personal branch named after yourself (for example, alex) and work on that branch. Never make your changes directly on main or dev. Submit a pull request targeting dev. A maintainer handles merging approved work and any later release to main.
For short reminders and recommended settings, see Git Settings & Important Information.
1. What is Git, and what are we trying to do?
Git is a version control system. It records changes to files, lets you revisit older versions, and allows several people to work on the same project without overwriting each other's work.
A repository (repo) is the project's collection of files and change history. The repository on GitHub is the remote; the copy on your computer is your local repository. Cloning makes your initial local copy. You only clone once per repository per computer.
| Term | Meaning |
|---|---|
| Git | Software that tracks file revisions. |
| GitHub | The website where the team's shared repositories and pull requests live. |
| Clone | Download a working local repository and its history. |
| Branch | An independent line of changes; you must make your own. |
| Commit | Record selected file changes locally. |
| Push | Send committed changes from your local branch to GitHub. |
| Fetch | Check/download new remote changes without modifying your current files. |
| Pull | Fetch and then integrate remote changes into your current branch. |
| Pull request (PR) | Ask for your branch's changes to be reviewed and merged into another branch. |
How team changes reach the project
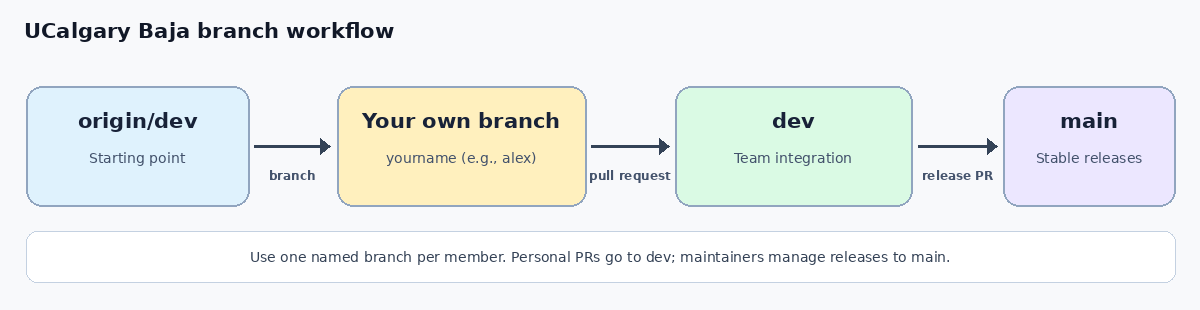
Read this from left to right: start from the current dev code, create your personal branch (yourname), work there, and propose a PR into dev. Continue using your personal branch for later changes. The separate dev → main release PR is handled through the team's release process, not by new contributors.
2. Before you begin
You will need:
- [x] A personal GitHub account and permission to access the specific UCBaja repository. Ask a project maintainer for access if you cannot view it.
- [x] Git installed on your Windows computer.
- [x] Internet access to reach GitHub.
- [x] A text editor, such as Visual Studio Code, or the project's preferred development environment. (Espressif ESP-IDF)
- [x] The repository's exact URL (from the Code → SSH menu on its GitHub page).
Note: TortoiseSVN and Git are different version control systems. Installing Baja Connect/TortoiseSVN does not automatically create a Git repository or install/configure Git for this workflow.
3. Install Git for Windows
- Open the official Git for Windows download page.
- Download and run the installer for your system. Standard defaults are generally fine for beginners.
- When the installer asks how Git should be used from the command line, choose Git from the command line and also from 3rd-party software (the usual recommended option).
- Open Command Prompt from the Start menu. Alternatively, open Windows Terminal and select the Command Prompt profile (not PowerShell).
- Verify Git is available:
bat
   git --version
You should see a Git version number. If Command Prompt cannot find git, close and reopen the terminal. If necessary, rerun the Git installer and enable the command-line option described above. All examples in this guide use Windows Command Prompt (cmd.exe) syntax, not PowerShell or Git Bash syntax.
4. Tell Git who you are
In Command Prompt, replace the examples with your own display name and an email address verified on your GitHub account (or GitHub's provided no-reply email):
git config --global user.name "Your Name"
git config --global user.email "you@example.com"
Check the values:
git config --global user.name
git config --global user.email
These values identify you on future commits. Your Git name is not necessarily the same as your GitHub username.
5. Set up GitHub SSH authentication
SSH lets your computer securely authenticate Git operations to GitHub. An SSH key pair consists of a private key (which must stay secret) and a public key (which you add to GitHub). An SSH key is not the same thing as a passkey used to sign into a website.
5.1 Check whether you already have a key
In Command Prompt, list any existing SSH key files in your Windows user profile:
dir /a "%USERPROFILE%\.ssh"
If the folder does not exist, Command Prompt may report that it cannot find the path; that simply means there is no existing .ssh folder to inspect. If you already see id_ed25519 and id_ed25519.pub, you may be able to reuse them. Do not overwrite an existing private key. If you do not have a suitable key pair, generate one:
ssh-keygen -t ed25519 -C "you@example.com"
Replace the email address with your own. Press Enter to accept the default Windows location (normally C:\Users\YourName\.ssh\id_ed25519) only if it will not overwrite an existing key. Enter a secure passphrase when prompted.
5.2 Using your private key
You do not need to run a Linux ssh-agent command or set up a service just to continue. When you use the key, SSH may ask for its passphrase; enter it if prompted. Optional Windows SSH-agent setup is described in Git Settings & Important Information.
5.3 Register the public key with GitHub
Copy your public key to the Windows clipboard from Command Prompt:
type "%USERPROFILE%\.ssh\id_ed25519.pub" | clip
Open GitHub → Settings → SSH and GPG keys, select New SSH key, choose an appropriate name for your computer, set its type to Authentication Key, paste the public key, and save.
Never upload, paste, email, or share id_ed25519 (without .pub). That is your private key.
5.4 Test SSH access
ssh -T git@github.com
On the first connection, compare the displayed host fingerprint against GitHub's published SSH fingerprints before accepting it. A successful response addresses you as your GitHub username and says that GitHub does not provide shell access. That message indicates successful SSH authentication; it does not mean you have permission to every private repository.
6. Clone the team repository to your computer
- Open the project repository in the UCBaja organization.
- Click Code, select the SSH tab, and copy the provided URL.
- Choose a folder for your code. This guide uses
C:\Codeas an example. - In Command Prompt, create the folder if needed, open it, clone the repository, and enter the new project folder:
bat
   if not exist "C:\Code" mkdir "C:\Code"
   cd /d "C:\Code"
   git clone git@github.com:UCBaja/{{REPO_NAME}}.git
   cd /d "REPO_NAME"
Replace REPO_NAME with the actual repository name, or paste the exact SSH URL copied from GitHub. Git normally creates a subfolder named after the repository.
Confirm that you are inside the repository:
git status
git remote -v
origin is the normal nickname for the GitHub repository you cloned. Do not use git init inside this downloaded repository. Do not re-clone it every day.
7. Create your own named branch — required
Do this before editing any project files. Git often opens a newly cloned repository on main (or the repo's other default branch). That does not mean you should work there.
First get the latest remote information:
git fetch origin
git branch -r
Check that the list contains origin/dev. If it does not, ask a maintainer which starting branch applies to this repository instead of guessing.
Your branch is just your name (or your agreed team username). For example, Alex would use alex. You keep using this branch for your project; you do not need a new branch for each task.
If your personal branch does not yet exist, create it from origin/dev:
git switch --no-track -c {{yourname}} origin/dev
Replace yourname with your actual branch name (for example, alex). Do not type yourname literally.
If the list from git branch -r already includes origin/yourname, use the existing remote branch instead:
git switch --track origin/{{yourname}}
Use only one of these two methods. The --no-track option on a new branch prevents it from mistakenly tracking shared origin/dev; your first push later will set its upstream to your own remote branch. If you already have a local personal branch, use git switch yourname instead.
Verify:
git branch --show-current
git status
The printed branch name should be your personal branch, not main or dev. Stop and correct it if it isn't.
8. Edit, review, and commit your work
Open the project folder in your preferred editor, then make your change. Before saving a commit, check what you modified:
git status
git diff
Stage only the files you intend to include:
git add ".\path\to\changed-file.txt"
Replace .\path\to\changed-file.txt with the actual file path relative to your repository folder; do not literally type the placeholder. If you deliberately want to stage all current changes, you can use git add . after checking they contain no passwords, tokens, .env secrets, large generated files, or unrelated work.
Review the staged changes, then commit:
git diff --staged
git commit -m "Add sensor dashboard documentation"
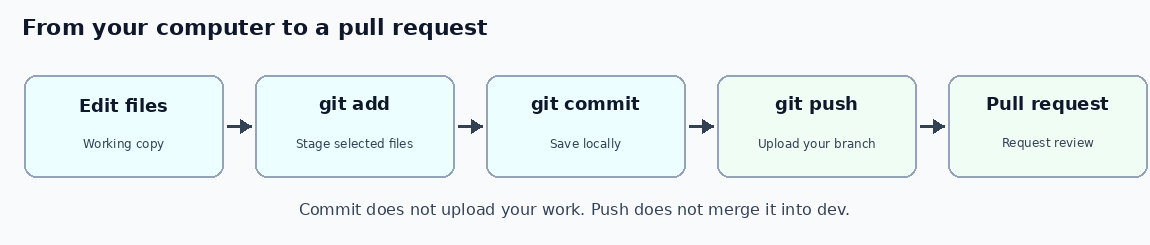
The commit is saved on your computer, on your branch. It is not on GitHub yet.
Local versus remote work
9. Push your personal branch to GitHub
On your first push of this branch:
git push -u origin {{yourname}}
Replace the branch name with exactly what git branch --show-current prints. -u sets the upstream to the remote copy of your personal branch so later pushes can use git push.
If the branch already exists on GitHub and tracks origin/{{yourname}}, simply use git push. For subsequent changes on your personal branch:
git add ".\path\to\changed-file.txt"
git commit -m "Explain dashboard configuration"
git push
Never push straight to main or dev. Pushing your branch is not the same as having your work merged.
10. Open a pull request into dev
- Open your UCBaja repository on GitHub.
- After pushing, select Compare & pull request, if shown; otherwise open the Pull requests tab and choose New pull request.
- Set base:
dev(where you want the change to go). - Set compare:
yourname(your personal branch containing the change). - Give the PR a clear title and describe what changed, how it was tested, and any questions for the reviewer.
- Submit the PR and respond to requested changes. When changes are requested, commit and push them to the same personal branch; the PR updates automatically.
Do not select main as the PR target for normal development. After the change is approved, a reviewer/maintainer can merge it into dev according to the project's process.
11. Keep working without losing teammates' changes
When you reopen the project
Open Command Prompt (or the Command Prompt profile in Windows Terminal), then switch to your existing project folder:
cd /d "C:\Code\REPO_NAME"
git status
git branch --show-current
git fetch origin
If you are collaborating on the same personal branch from another computer, while on your own branch and with a clean working tree, bring in its latest remote commits with:
git pull --ff-only
git pull --ff-only is for a branch that already tracks its own corresponding remote branch; it can refuse to run if your histories have diverged. Don't use it to switch from main to dev or to create a branch.
When dev has moved forward
To incorporate new dev changes into your personal branch, first commit or safely set aside any uncommitted work. Then:
git switch {{yourname}}
git fetch origin
git merge origin/dev
This merges updated dev into your branch, not the other way around. If Git reports a conflict, stop and resolve it carefully; see Troubleshooting. Push your personal branch again when everything is checked.
Starting your next piece of work
Keep using your existing yourname branch. You do not need to create another branch for each new task. Before starting, make sure your current work is committed, then fetch and merge the latest shared dev into your personal branch:
git switch {{yourname}}
git fetch origin
git merge origin/dev
If a previous PR was squash-merged, your branch history may not line up cleanly with dev. Ask a maintainer to help synchronize your branch before opening another PR if older changes appear again. Do not force-push or reset your branch to fix this yourself.
12. First-time setup checklist
- [x] Git installed and
git --versionworks. - [x] Name and email configured with Git.
- [x] GitHub SSH authentication works.
- [x] You can access the intended UCBaja GitHub repository.
- [x] The repository has been cloned locally once.
- [x]
git branch --show-currentshows your own named branch (for example,alex), notmainordev. - [x] Your changes are committed and pushed to your own branch; you will continue using that branch for later changes.
- [x] Your PR's base is
dev, notmain.
13. Common problems
| Problem | What to check / safe response |
|---|---|
git is not recognized |
Install Git for Windows with the recommended command-line option, then reopen Command Prompt. |
Permission denied (publickey) |
Check that you registered the public key on GitHub, that your private key is in your Windows .ssh folder, and retry ssh -T git@github.com. |
Repository not found |
Double-check the exact clone URL, organization membership, repository invitation, and permission to that private repo. SSH authentication alone is not repository authorization. |
fatal: not a git repository |
Use cd to enter the cloned repository's folder, not its parent. |
origin/dev is missing |
Confirm the project has a dev branch; ask a maintainer before creating your own starting branch. |
nothing to commit |
Check git status; files may already be committed or not actually changed. |
| Merge conflict | Run git status, inspect the conflicting files, and ask for help if unsure. After resolving each file, git add it and finish the merge; git merge --abort can cancel an in-progress merge if you have not resolved it. |
| Push rejected / non-fast-forward | Do not force-push. Fetch and check the branch and upstream; ask a maintainer if you cannot tell why histories differ. |
Accidentally on main or dev |
Stop before committing or pushing. Ask a maintainer for the safest way to preserve your work and create the correct branch. |
Safety reminder: Avoid git push --force, git reset --hard, and commands you do not understand. These can overwrite or discard work.
14. Further reading
- Git Settings & Important Information — branch rules, settings, command quick-reference, and terminology.
- Git for Windows — official installer.
- GitHub: Cloning a repository.
- GitHub: Connecting with SSH.
- GitHub: Creating a pull request.