Installing UCalgary Baja Software with Baja Connect
For: UCalgary Baja team members using Windows 10 or Windows 11
Baja Connect is the team's setup application. It helps prepare your computer to access UCalgary Baja's private network and shared project files by configuring two key applications: Tailscale and TortoiseSVN. You do not need to configure their servers or create a separate personal Tailscale account.
1. Download Baja Connect
Baja Connect (Windows)
App Download Link
If you are a new team member, first follow the registration/onboarding link provided in your team invitation. The UCalgary Baja onboarding portal is used for member setup; after onboarding, use the Download Baja Connect option provided to you in the Members Portal.
Before beginning:
- Use a computer running Windows 10 or Windows 11 with an internet connection.
- Complete your team account registration and have your passkey ready.
- Have permission to approve software installations on the computer. Windows may request administrator approval.
Run Baja Connect
- Download Baja Connect using the official team-provided link.
- Open the zip file and run the exe.
-
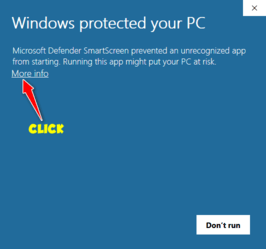
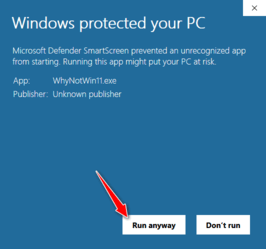
Windows will probably show you a warning window about 'Windows protected your PC', simply click "More info".
-
Open Baja Connect. Approve a Windows administrator/UAC prompt if one appears and you recognize the application as the team-provided installer.
- Follow the instructions in the app. When it opens your web browser to authenticate, complete sign-in with your team account and passkey.
- Return to Baja Connect and follow any remaining on-screen prompts while it installs/configures Tailscale and TortoiseSVN, connects your computer, and prepares your SVN working copy.
- Wait for the application to indicate that setup has completed successfully. Do not close it while setup is in progress.
2. Signing In with a Passkey
A passkey is a secure alternative to a traditional password. Instead of remembering and typing a password, you approve sign-in using something that unlocks a device you control, such as Windows Hello (PIN, fingerprint, or face recognition) or a phone's screen lock. Passkeys use cryptographic keys, so your private sign-in key is not sent to the website.
How passkey authentication works in Baja Connect
- Baja Connect opens your default web browser for UCalgary Baja authentication.
If the browser you use (or the one with the passkey) is not your default browser, then you need to change it, even temporarily. Change Default Apps on Windows
- On the sign-in page, choose your existing passkey when prompted. Depending on where your passkey is saved, Windows may offer Windows Hello, a password manager, a security key, or a phone-based option.
- Approve the sign-in on the device holding your passkey. A phone-based sign-in may involve scanning a QR code and confirming on your phone.
- After successful authentication, the browser hands control back to Baja Connect, which retrieves the authorized configuration for your computer.
First time using a passkey? Complete the passkey setup provided during your team account onboarding before running Baja Connect. If your account does not have a working passkey, contact the team member responsible for onboarding.
** Security reminder **
Never share a passkey, one-time sign-in link, recovery code, or device-unlock PIN. Only approve sign-in requests that you initiated.
3. Tailscale Client — Secure Team Network Access
Tailscale provides an encrypted private connection between your computer and approved UCalgary Baja systems, even when you are away from campus. The team uses its own network coordination service to manage approved devices and access.
Baja Connect is responsible for installing/configuring the Tailscale client and registering your computer with the team's private network. You should not need to create a personal Tailscale account or manually enter a server address or authorization key.
What to expect
- Tailscale runs in the background after it has been installed and configured.
- Its icon is usually in the Windows system tray beside the clock; select the up arrow if the icon is hidden.
- Tailscale must be connected for tools that depend on access to private Baja services, including the team SVN server.
If Tailscale is installed but is not connected to the Baja network, rerun Baja Connect or ask the Software Sub-Team for help. Do not switch the client to a personal Tailscale network as a troubleshooting step.
Learn more: What is Tailscale?
4. TortoiseSVN — Shared Project Files and Version Control
TortoiseSVN is a Windows File Explorer extension for Subversion (SVN), the system used to track changes to shared project files. It lets team members download the latest approved files, review changes, and submit their work back to the repository.
Baja Connect is intended to install/configure TortoiseSVN, set up the required access credentials, and prepare an initial working copy (the local folder containing your SVN-managed project files). The team's Windows working-copy location is generally C:\UCBaja, unless your Baja Connect setup specifies a different path.
Everyday TortoiseSVN actions
| Action | What it does |
|---|---|
| Update | Downloads the latest repository changes into your local working copy. Do this before starting work and when you need colleagues' latest changes. |
| Get Lock | Obtains a lock on the file, ensuring no two members can edit a file at the same time. Others can still view the file. |
| Release Lock | Once you are done editing a file. Releasing the file so others may edit it. |
| Commit | Uploads your selected changes to the shared repository, with a message describing what you changed. Please, please use commit messages |
| Revert | Discards selected local, uncommitted changes. Use carefully because discarded edits may not be recoverable. |
Where to find TortoiseSVN
- Windows 10: Open File Explorer, right-click inside your SVN working copy or on a versioned file/folder, and choose the relevant SVN or TortoiseSVN action.
- Windows 11: Right-click in File Explorer. If the SVN actions are not in the first menu, select Show more options to open the classic context menu.
Commands change depending on whether you right-click a versioned file, a working-copy folder, or a folder that is not under SVN. Some actions appear inside the TortoiseSVN submenu rather than the main right-click menu.
Good habit: Run SVN Update before editing shared files, then review your changes and use SVN Commit with a meaningful message when your work is ready. Avoid manually creating a second checkout if Baja Connect has already set one up.
Learn more: TortoiseSVN documentation
5. Confirm Setup Is Working
After Baja Connect reports that setup is complete:
- [x] Authentication: Your passkey sign-in completed successfully and Baja Connect returned to its setup process.
- [x] Tailscale: The client appears in the Windows system tray and is connected to the UCalgary Baja private network.
- [x] TortoiseSVN: SVN commands are available when you right-click a versioned folder in File Explorer.
- [x] Working copy: Your assigned Baja project folder (normally
C:\UCBaja) exists and contains the folders you are authorized to access. - [x] SVN access: An SVN Update completes without a network or authentication error.
If something does not work
Passkey sign-in fails: Check that your team onboarding/passkey setup is complete, then retry sign-in from Baja Connect.
Tailscale is missing or disconnected: Rerun Baja Connect so it can check its installation and team-network configuration.
TortoiseSVN commands are missing: Make sure TortoiseSVN finished installing. If the installation has just completed, try reopening File Explorer or restarting Windows.
SVN says the server cannot be reached or requests unexpected credentials: Check Tailscale connectivity first, then rerun Baja Connect. If the problem persists, contact the Software Sub-Team and include the error message shown in the app.
6. Configure the SVN Context Menu
The final step (maybe) is to configure the right-click context menu. Instruction can be found here.
Additional reference: What are passkeys? — FIDO Alliance